Are you an iPhone user? Then you might have hardly found a way still date to record your calls on your iPhone. If you have already found a way, then it’s good. But if not, then this guide will lead you through the process. Generally, there is hardly any way found for recording iPhone calls in India. For western countries, few apps are available of course for iPhone users, but none of then are free. You have to pay pretty good amount for that. But if you are an iPhone user residing in India, then the task is almost impossible for you. But following this article, users can record a iPhone call in India and that without losing a penny.
But for that you need to connect your device with a Mac and must connect both the iPhone and Mac to a single WiFi network. But again the term comes that you need to have the consent of the concerned person whose call you are recording using this trick. Because recording someone’s call without his permission is a criminal offense, so you need to be extra careful for this. However, if you are serious to record someone’s call on your iPhone, then you can put your handset on speaker and can record the audio with another phone. But the recording will not be much clear.
Also Read: Now Subscribe to Apple Music at just Rs.1200 per Year
By following the below mentioned trick you can materialize the task with your Mac. But before you must know how to make or receive a call using your Mac. Before starting the procedure you have to make sure that your Mac is capable of making or receiving calls. Generally Macs running on OS X Yosemite or newer are capable of making and receiving calls. Also your iPhone must run on iOS 8 or above versions to get connected to your Mac. Now let’s know how to receive or make calls via Mac.
- At first go to Settings > Phone > Calls on Other Devices on your iPhone and enable Allow Calls on Other Devices.
- You can enable it by tapping the switch next to your Mac under “Allow Calls On.” Turning the Mac green will confirm that it’s enabled.
- You need to ensure that your iPhone and Mac are connected to the same Network and connect both the devices to the same iCloud account.
- Then sign in to FaceTime using the same iCloud account on both the devices.
- Also check out that you have activated Bluetooth in both the devices and your iPhone is near to the Mac.
- Now the moment you receive a call on your iPhone, you will also see a notification on your Mac. You can use the notification to receive the call. Also using the same process you can make a call from your Mac.
But now you need to know how you can record phone calls on iPhone via Mac. Let’s have a look on the process.
Also Read: Has your iPhone stopped responding? Then know How you can hard reset your device
Though there are many software that will work well, but Audio Hijack works the best. So download this software on your Mac and is a paid software that costs around $49 (Approx Rs.3,200). But you can record free of cost up to 20 minutes using this application.
- After downloading the software press CMD+N to open a New Session. You can also manually opt it clicking on Sessions in the Top bar and selecting New Session.
- Now you will be promoted to select a Session Template. Next double-click on Application Audio.
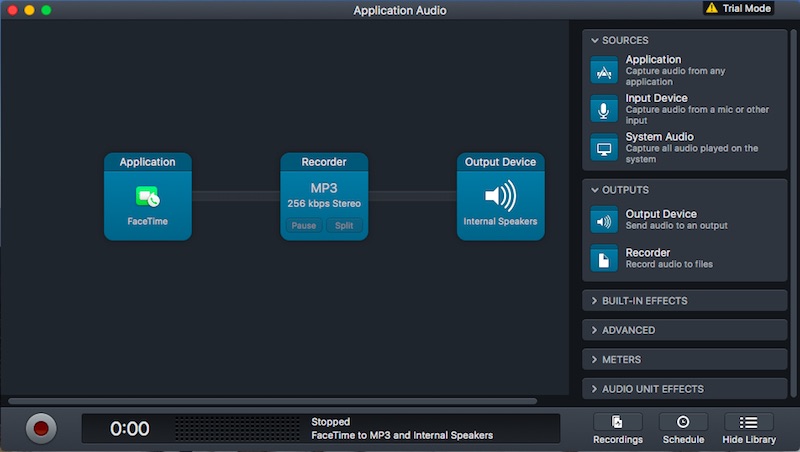
- Now three blocks i.e. Application, Recorder, and Output will appear in the left side of your software. Opt the Application block and from the drop-down under Source, select FaceTime.
- You are all done. Now when making or receiving calls from your Mac, click the Recording button that appear at the bottom left corner of the software window.
- Once the recording is done, click on the same recording button to stop. From Recordings, you can get the recorded files.
But as I told you earlier this free app can only record up to 20 minutes, so recording beyond the timeline will not add value to your recordings as it will include a large amount of noise. So if your recording is more than 20 minutes you can start it again after 20 minutes to get better audio. Also ensure to be in WiFi range while making the recordings, else it might not bring you good output.
Source: NDTV

